
Classic Snowball Cookies

Delicate, buttery snowball cookies rolled in powdered sugar — a timeless, melt-in-your-mouth treat perfect for holidays, gifts, and cozy afternoons.

This batch of snowball cookies is the one I reach for every holiday season and whenever I crave a buttery, melt-in-your-mouth treat. I first discovered this version during a snowy December when a neighbor dropped a tin on my porch; after one bite I tracked her down for the details. The dough is forgiving, the flavors are simple, and the finish — a generous roll in powdered sugar while the cookies are still warm — creates that signature snow-dusted look and soft outer texture. Over the years I have adapted the formula slightly to match pantry staples and dietary preferences, but the heart of the cookies remains the same: rich fat, fine flour, and toasted nuts for a tender, crumbly bite.
What makes these cookies so special is their textural contrast. The interior is cakey and tender thanks to the high fat ratio and careful, gentle mixing, while the nuttiness of finely chopped walnuts, pecans, or almonds gives a subtle crunch and depth of flavor. I often make a double batch because they keep well and travel beautifully; friends have told me they taste even better the next day once the sugar has settled into the crevices. If you grew up on holiday tins, these will evoke that same nostalgic feeling, and if you have never tried them, they are an easy and impressive first step into classic cookie baking.
Why You'll Love This Treat
- Simple pantry ingredients create bakery-quality results without complex techniques or special equipment.
- Ready in about 40 minutes from start to finish, including baking, which makes these great for last-minute guests.
- Adaptable to dietary needs: use coconut oil for dairy-free versions or certified gluten-free flour blends to avoid gluten.
- Makes a large yield, ideal for gift tins, cookie swaps, or freezing for later enjoyment.
- Versatile finish: roll in powdered sugar for classic look or in cocoa for a chocolate kiss variation.
- Low hands-on time; the dough comes together quickly and tolerates gentle overwork better than many delicate cookies.
I once made these for a neighborhood cookie exchange and came home with compliments and an empty tin. My kids love helping to roll the warm cookies in powdered sugar, which is the part that always makes them giggle. The first winter I made them with spelt flour I learned that the texture was slightly nuttier and denser, appealing to adults while still winning over kids when dusted generously with sugar.
Ingredients
- All-purpose flour (2 cups): Use white all-purpose for the classic tender crumb. I have also used spelt or whole wheat pastry flour for a nuttier note, and Bob's Red Mill gluten-free blend works well if you need a gluten-free option. Measure by spooning the flour into the cup and leveling for accuracy.
- Finely chopped nuts (1/2 cup): Walnuts, almonds, or pecans add texture and flavor. Toast them lightly in a dry skillet for 3 to 5 minutes to amplify the aroma before chopping.
- Butter or coconut oil (1 cup): Unsalted butter gives the classic flavor; for dairy-free versions use refined coconut oil to avoid coconut flavor, or a dairy-free butter alternative that behaves similarly when chilled.
- Powdered sugar (1/2 cup): Incorporate into the dough for sweetness and a silky texture. Reserve extra powdered sugar for rolling as the cookies finish baking.
- Optional coating: Additional powdered sugar or a mixture of powdered sugar and a tablespoon of cocoa powder for a chocolate-dusted variation. Use sugar-free powdered options to reduce sugar if desired.
Instructions
Preheat the oven: Set the oven to 325 degrees Fahrenheit. Position racks in the center of the oven so heat circulates evenly. Line a baking sheet with parchment paper or a silicone mat to prevent sticking and promote even browning. Cream fat and sugar: In a medium bowl or the bowl of a stand mixer fitted with the paddle attachment, combine 1 cup of softened butter or solidified-but-mixable coconut oil with 1/2 cup powdered sugar. Beat on medium speed until the mixture is light and slightly fluffy, about 1 to 2 minutes. This aeration helps create a tender texture. Combine dry ingredients: In a separate bowl, stir together 2 cups flour and 1/2 cup finely chopped nuts. If you toasted the nuts, allow them to cool before combining to avoid melting the fat in the creamed mixture. Gently fold the dry mixture into the creamed fat until just combined; avoid overmixing to keep the cookies tender and crumbly. Shape the cookies: Form the dough into small balls using a cookie scoop or a tablespoon measure. Aim for uniform sizes for even baking. Arrange on the prepared sheet about 1 inch apart. For a slightly crisper edge, press the tops gently; for a rounder snowball, leave them untouched. Bake until lightly browned: Bake in the preheated oven for 20 to 25 minutes, or until the bottoms are lightly golden and the tops are no longer glossy. Visual cues are important: do not wait for deep color. Overbaking will dry them out. Allow cookies to rest on the sheet for 2 minutes before transferring to the rolling step. Roll in powdered sugar: Prepare a shallow bowl of powdered sugar. While the cookies are warm (but not piping hot), gently roll each one to coat completely. The warmth helps the sugar adhere and creates the classic snow-dusted finish. Transfer to a wire rack to cool completely; roll a second time once cooled for a thicker coating if desired.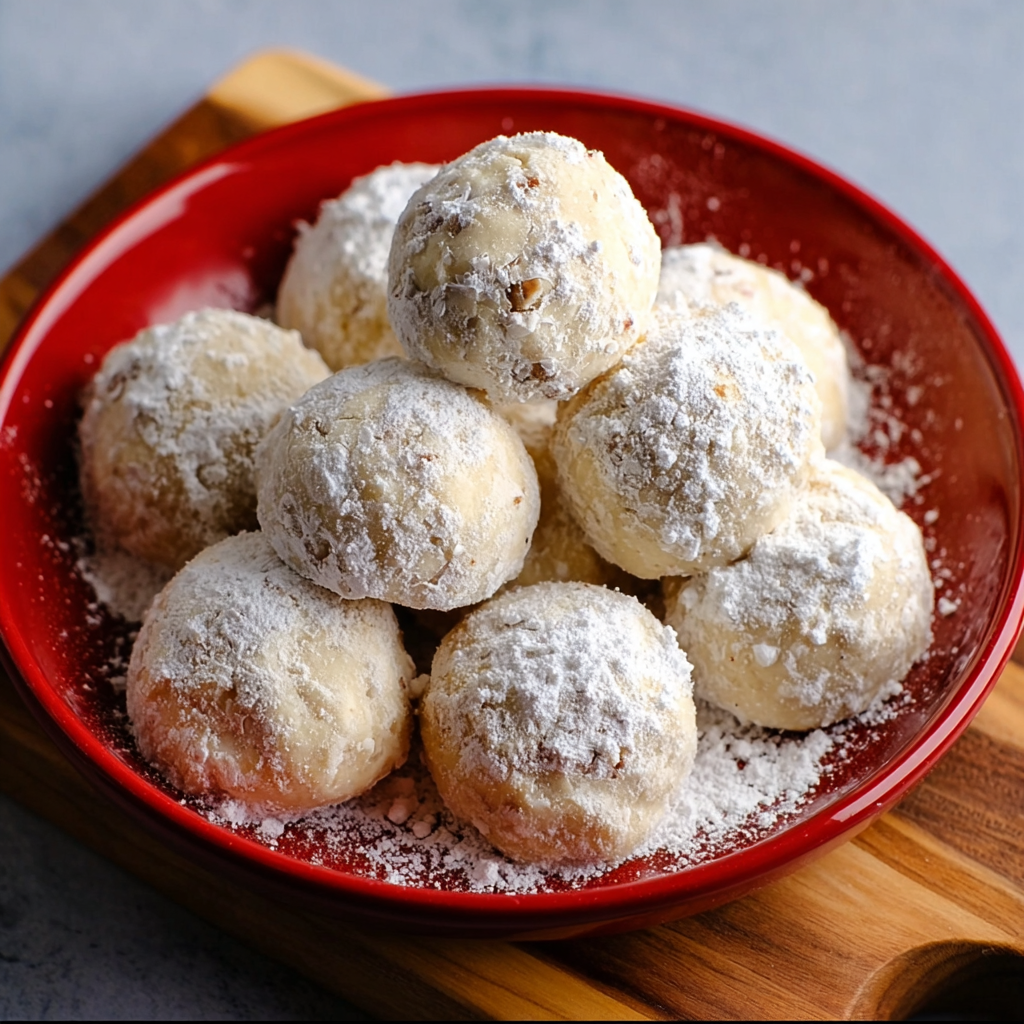
You Must Know
- These cookies freeze very well for up to three months. Freeze plain or pre-rolled in powdered sugar and thaw gently at room temperature.
- They are high in fat and provide a satisfying, rich bite; portion control matters if you are watching calories.
- If you need a nut-free version, omit the nuts and add 1/4 cup extra flour plus a teaspoon vanilla or almond extract substitute for flavor complexity.
- Use a gentle hand when mixing after you add the flour; overworking develops gluten and makes the cookies tougher.
My favorite thing about these cookies is their versatility. I have a memory of making them on a snowy evening with music playing and a batch disappearing between hot cocoa refills. Each family member has their preference for which nut to use, and tasting different versions became a fun little ritual. They travel well to potlucks and come out of tins tasting fresh.
Storage Tips
Store cooled cookies in an airtight container at room temperature for up to 5 days. To preserve the powdered sugar coating, layer cookies with parchment paper and shake a little extra powdered sugar over each layer before sealing. For longer storage, freeze in a single layer until firm, then stack with parchment between layers and seal in a heavy-duty freezer bag; freeze for up to three months. Thaw at room temperature for 30 minutes before serving. If the coating looks dulled after freezing, re-roll lightly in powdered sugar.
Ingredient Substitutions
You can replace butter with 1 cup refined coconut oil for a dairy-free variation; the texture will be slightly different, with a bit less richness. If you need gluten-free, use a one-to-one baking blend such as Bob’s Red Mill Measure for Measure and add a teaspoon of xanthan gum if your blend lacks it. For nut-free, omit nuts and add 1/4 cup extra flour plus a teaspoon of almond extract replacement or extra vanilla. Use sugar-free powdered sugar if cutting sugar, though flavor and mouthfeel will change subtly.
Serving Suggestions
These are perfect with a cup of hot tea, coffee, or spiced cocoa. For holiday presentation, arrange on a platter with fresh rosemary sprigs and cranberries for color contrast. They make lovely gifts when stacked in a tin or cellophane bag tied with ribbon. Serve alongside sharper desserts to balance sweetness, or pair with citrus sorbet for a refreshing contrast at the end of a meal.
Cultural Background
Snowball cookies, with variations known as Russian tea cakes or Mexican wedding cookies, have roots across several baking traditions. The common elements are a buttery shortbread-like base, finely chopped nuts, and a powdered sugar coating. Different cultures adapted the cookie to local nuts and flavors, creating small regional distinctions. The name often reflects the visual effect of the final dusting of sugar, evoking fresh snow. These little cookies became staples at celebrations because they are easy to produce in large batches and travel well.

Seasonal Adaptations
In winter, add a pinch of cinnamon or cardamom to the dough for warmth. For spring, fold in 1 teaspoon lemon zest and roll in a mix of powdered sugar and a touch of lemon zest for brightness. At holiday time, swap half the nuts for finely chopped pistachios and dust with a green-tinted powdered sugar for festive color. You can also press a small jam dot into the center of each cookie after baking for a thumbprint-like seasonal variation.
Meal Prep Tips
For make-ahead baking, shape the dough into balls and freeze on a tray until firm. Transfer to a sealed bag and bake from frozen, adding a few extra minutes to the bake time. Alternatively, bake and freeze fully cooled cookies in layers separated by parchment; when you need them, thaw at room temperature for 30 minutes and re-roll lightly in powdered sugar. This approach keeps batches ready for unexpected guests or gift-giving.
These snowball cookies are a small sweet pleasure that can become a comforting ritual. Whether you bake them for a celebration or a quiet afternoon with tea, they are easy to personalize and reliably delicious. I hope you make them, tweak them, and enjoy sharing them with people you love.
Pro Tips
Toast nuts briefly in a dry skillet to deepen flavor, then cool completely before chopping and adding to the dough.
Measure flour by spooning it into the measuring cup and leveling with a knife to avoid dense cookies.
Roll the warm cookies in powdered sugar for best adhesion; roll again after cooling for a thicker coating.
Avoid overmixing after adding flour to keep the texture tender and crumbly.
This nourishing classic snowball cookies recipe is sure to be a staple in your kitchen. Enjoy every moist, high protein slice — it is perfect for breakfast or as a wholesome snack any time.
FAQs about Recipes
Can I make these gluten-free?
Yes. You can use a gluten-free one-to-one flour blend such as Bob's Red Mill Measure for Measure. The texture will be slightly different but still tender.
How do I make them dairy-free?
Use refined coconut oil or a dairy-free butter alternative. Keep the same volume measurement for similar results.
Tags
Classic Snowball Cookies
This Classic Snowball Cookies recipe makes perfectly juicy, tender, and flavorful steak every time! Serve with potatoes and a side salad for an unforgettable dinner in under 30 minutes.
Instructions
Preheat the oven
Preheat oven to 325 degrees Fahrenheit and line a baking sheet with parchment paper or a silicone mat.
Cream butter and sugar
In a medium bowl or stand mixer, beat 1 cup softened butter or refined coconut oil with 1/2 cup powdered sugar until light and slightly fluffy, about 1 to 2 minutes.
Combine dry ingredients
Stir together 2 cups flour and 1/2 cup finely chopped nuts in a separate bowl. Fold the dry mixture into the creamed fat until just combined, avoiding overmixing.
Shape and bake
Form dough into balls using a tablespoon or small cookie scoop and place 1 inch apart on the prepared sheet. Bake 20 to 25 minutes until bottoms are lightly golden and tops are set.
Roll in powdered sugar and cool
While still warm, roll each cookie in powdered sugar to coat. Transfer to a wire rack to cool completely and roll again if a thicker coating is desired.
Last Step: Please leave a rating and comment letting us know how you liked this recipe! This helps our business to thrive and continue providing free, high-quality recipes for you.
Nutrition
Did You Make This?
Leave a comment & rating below or tag
@solushcooks on social media!
Categories:
You might also like...

Spaghetti Squash Mac & Cheese
A lighter take on a classic comfort favorite that swaps pasta for roasted spaghetti squash and keeps all the creamy, cheesy goodness with optional broccoli or chicken for extra heartiness.

Coconut Cream Pie Overnight Oats
A dreamy no-cook breakfast that tastes like coconut cream pie — creamy coconut milk, tangy Greek yogurt, shredded coconut, and optional banana make mornings feel indulgent and effortless.

Roasted Sweet Potato Rounds with Honey & Feta
Crisp-edged sweet potato rounds roasted until tender, finished with salty feta, a drizzle of honey, and fresh parsley—an effortless crowd-pleaser for gatherings or weeknights.
Did You Make This?
Leave a comment & rating below or tag @solushcooks on social media!
Rate This Recipe
Share This Recipe
Enjoyed this recipe? Share it with friends and family, and don't forget to leave a review!
Comments (1)
This recipe looks amazing! Can't wait to try it.
Comments are stored locally in your browser. Server comments are displayed alongside your local comments.

Hi, I'm Lena!
What's Popular

30-Minute Meals!
Join to receive our email series which contains a round-up of some of our quick and easy family favorite recipes.