
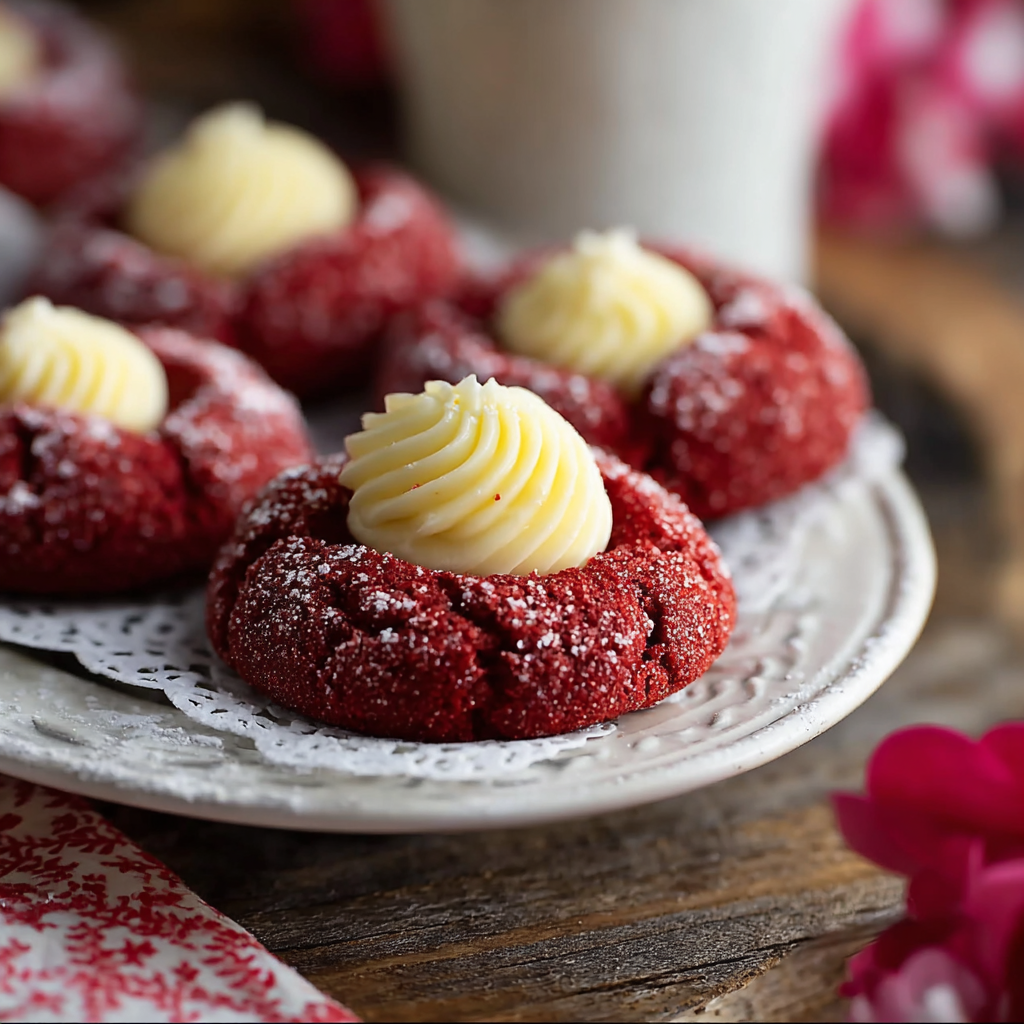
Red Velvet Thumbprint Cookies with Cream Cheese

Soft red velvet cookies with a tangy cream cheese center that are perfect for parties, holidays, or a decadent afternoon treat.
This Red Velvet Thumbprint Cookies with Cream Cheese recipe arrived in my kitchen on a blustery November afternoon when I wanted something festive, but not fussy. I had a partial idea of the classic thumbprint cookie and a tub of cream cheese in the fridge. One oven test later I had the combination of soft, tender cookie dough that held its shape and a silky, lightly sweet filling that contrasted beautifully with the cocoa tinted crumb. These cookies became an immediate hit at our family cookie swap and a dish I reach for whenever I want to make something that looks special but is genuinely easy to assemble.
The texture is the real star here. The exterior edges set up just enough during baking to create a delicate bite while the interior stays soft and tender. The small cream cheese dollop melts into the indentation without running if you follow the timing and portion sizes I use. Flavor wise, the cocoa adds depth and the red coloring gives the classic visual appeal. They are a great make ahead treat that travel well to potlucks, and children and adults both love them because of the contrast of cake like cookie and creamy center.
Why You'll Love This Recipe
- Ready in under 45 minutes from start to finish when you work with room temperature ingredients and a warm oven. The hands on time is about 15 minutes.
- Uses pantry staples such as all purpose flour, granulated sugar and cocoa powder plus simple cream cheese filling made with powdered sugar.
- Perfect for holiday trays or a casual afternoon treat because the cookies are small, portable and keep their texture even after a day out of the oven.
- The approach is very forgiving to slight variations in oven temperature and you can bake multiple trays in succession without losing the soft interior texture.
- Makes approximately two dozen cookies and the dough can be chilled for a firmer shape or baked immediately for a softer finish.
I first baked these for a small family gathering and watched my sister take a bite and close her eyes, then ask for the recipe. My neighbors asked if they could buy a batch. Over time I refined the cream cheese amount so it sits neatly in the indentation and bakes to a slightly set yet tender center. It is one of those recipes that looks like effort but gives you relaxed control and consistent results.
Ingredients
- Unsalted butter: Use 1 cup at room temperature so it creams smoothly with the sugar. I prefer a higher fat butter such as a European style brand for richer flavor, but any unsalted will work.
- Granulated sugar: 1 cup provides structure and light sweetness. For a softer cookie, make sure to cream the butter and sugar until pale and fluffy so the sugar dissolves somewhat into the butter.
- Large egg: Adds moisture and lift. Use at room temperature to help the dough come together evenly.
- Vanilla extract: 1 teaspoon enhances the overall flavor profile. Use pure vanilla for the best aroma.
- Cocoa powder: 2 tablespoons unsweetened cocoa gives the cookie its subtle chocolate backbone. Dutch processed adds depth but natural cocoa works fine.
- Red food coloring: 1 tablespoon to achieve the classic hue. Gel color is recommended for less added liquid and a more vivid color.
- All purpose flour: 2 cups provide the structure. Measure by spooning the flour into the cup and leveling off to avoid dense cookies.
- Baking powder: 1 half teaspoon for gentle lift and tender crumb.
- Salt: 1 quarter teaspoon to balance the sweetness and enhance cocoa flavor.
- Cream cheese: 4 ounces softened, at room temperature so it blends to a silky filling. Full fat yields the best texture.
- Powdered sugar: 1 half cup folded into the cream cheese to sweeten and stabilize the filling.
Instructions
Preheat and prepare: Preheat the oven to 350 degrees Fahrenheit and line a baking sheet with parchment paper. Position a rack in the middle of the oven. Take butter and cream cheese out of the refrigerator early so they reach room temperature and cream smoothly. Cream the butter and sugar: In a large bowl, beat 1 cup softened unsalted butter and 1 cup granulated sugar until the mixture is light and fluffy about 3 to 4 minutes with an electric mixer. The visual cues are a paler color and a slightly aerated texture which helps create a tender cookie. Combine wet ingredients: Beat in 1 large room temperature egg and 1 teaspoon vanilla extract until incorporated. Add 2 tablespoons cocoa powder and 1 tablespoon red food coloring. Mix until uniform in color and no streaks remain. Add dry ingredients: Gradually add 2 cups all purpose flour, 1 half teaspoon baking powder and 1 quarter teaspoon salt. Mix on low speed until just combined. Avoid over mixing to keep the texture tender. The dough will be soft but not sticky. Form and indent: Roll the dough into 1 inch balls and place them on the prepared baking sheet about 1 inch apart. Use your thumb or the back of a small spoon to press a shallow indentation in the center of each ball, about one quarter inch deep. Keep the indentation uniform for even filling capacity. Make the cream cheese filling: In a small bowl, beat together 4 ounces softened cream cheese and 1 half cup powdered sugar until smooth and spreadable. Spoon a small amount about one teaspoon into each indentation so it nestles without overflowing while baking. Bake and cool: Bake for 12 to 15 minutes or until the cookie edges are set and the centers look slightly soft. Let the cookies cool on the baking sheet for 5 minutes to firm up then transfer them to a wire rack to cool completely. This prevents the filling from breaking and helps cookies set evenly.
You Must Know
- These cookies freeze well for up to three months when stored in an airtight container. Thaw at room temperature and warm slightly if you prefer the filling softer.
- The recipe yields about 24 cookies depending on exact ball size. Use a one tablespoon cookie scoop for consistent portions.
- Allow ingredients to reach room temperature to ensure even mixing and smooth cream cheese filling. Cold butter or cream cheese will cause lumps.
- Use gel food coloring to avoid adding extra liquid which can change dough consistency.
My favorite aspect is how reliably these cookies travel. I have packed them into small tins and dropped them off at neighbors and they arrive with the centers still intact. The contrast between the mild cocoa in the dough and the tang from the cream cheese becomes more pronounced the next day, which makes them a great make ahead option.

Storage Tips
Store cooled cookies in an airtight container layered with parchment paper at room temperature for up to three days. For longer storage, freeze in a single layer on a tray until firm then transfer to a freezer safe container separating layers with parchment. Reheat frozen cookies in a 300 degree Fahrenheit oven for about 6 to 8 minutes to refresh the texture. Avoid keeping them by a hot stove or direct sunlight which can soften the cream cheese filling and affect appearance.
Ingredient Substitutions
You can swap part of the flour for whole wheat pastry flour for a nuttier flavor but expect a slightly denser texture. For a dairy free version use a vegan cream cheese and a plant based butter substitute though color and flavor will shift slightly. To reduce sugar in the filling use 1 quarter cup powdered sugar and a teaspoon of maple syrup but the filling will be softer so chill briefly before filling.
Serving Suggestions
Serve these with a cup of brewed coffee or black tea to balance the sweetness. For a festive platter, dust lightly with sifted powdered sugar and garnish with a small mint leaf on each cookie. They pair well with other small bites such as shortbread and nut based cookies for an attractive variety box.
Cultural Background
Red velvet treats are a modern American confection with roots in Southern baking traditions where the contrast of cocoa and buttermilk or vinegar created a deep red hue historically enhanced by chemical reactions with baking soda. The thumbprint cookie itself has European origins and combines a simple rolled dough with fillings such as jam or chocolate. This mash up of forms reflects how home bakers adopt classic techniques and adapt them with current flavors like cream cheese.
Seasonal Adaptations
In winter augment the filling with a teaspoon of orange zest to brighten the cream cheese. For Valentine themed gatherings shape the indentation slightly larger and pipe the filling using a small tip. In late summer consider replacing part of the powdered sugar with a berry puree that has been reduced on the stove to concentrate flavor then mixed into the cream cheese for a seasonal twist.
Meal Prep Tips
Prepare the dough and portion it into balls the night before. Keep them covered in the refrigerator on a baking sheet. The next day press indentations and fill before baking. This saves time on the morning of a party and helps the cookies hold a firmer shape if you prefer less spread. Use a one tablespoon scoop for uniform results and label containers with the bake date if freezing.
These cookies are a reliably charming dessert that marry simple technique with a show stopping appearance. I hope you enjoy baking them as much as I do and that they become part of your next gathering.
Pro Tips
Use gel food coloring to get vivid color without thinning the dough.
Beat butter and sugar until pale for a lighter texture and tender crumb.
Spoon about one teaspoon of filling into each indentation to prevent overflow during baking.
Measure flour by spooning into a cup and leveling off to avoid dense cookies.
This nourishing red velvet thumbprint cookies with cream cheese recipe is sure to be a staple in your kitchen. Enjoy every moist, high protein slice — it is perfect for breakfast or as a wholesome snack any time.
FAQs about Recipes
Can I chill the dough before baking?
Chill dough for 15 to 30 minutes if it seems too soft or if you need to make the dough ahead.
How long do these cookies keep in the freezer?
They freeze well for up to three months in an airtight container. Thaw at room temperature.
Tags
Red Velvet Thumbprint Cookies with Cream Cheese
This Red Velvet Thumbprint Cookies with Cream Cheese recipe makes perfectly juicy, tender, and flavorful steak every time! Serve with potatoes and a side salad for an unforgettable dinner in under 30 minutes.
Ingredients
Cookies
Filling
Instructions
Preheat and prepare
Preheat the oven to 350 degrees Fahrenheit and line a baking sheet with parchment paper. Allow butter and cream cheese to come to room temperature for easier mixing.
Cream butter and sugar
Beat 1 cup softened unsalted butter and 1 cup granulated sugar until pale and fluffy about 3 to 4 minutes. This step adds air for a tender result.
Add wet ingredients and color
Beat in 1 large room temperature egg and 1 teaspoon vanilla. Add 2 tablespoons cocoa powder and 1 tablespoon red food coloring until uniformly colored.
Incorporate dry ingredients
Add 2 cups all purpose flour, 1/2 teaspoon baking powder and 1/4 teaspoon salt gradually and mix until just combined to avoid over working the dough.
Shape and indent
Roll dough into 1 inch balls, place on the prepared sheet and press a uniform indentation into each ball about 1/4 inch deep using your thumb.
Prepare filling and bake
Beat 4 ounces softened cream cheese with 1/2 cup powdered sugar until smooth. Spoon about 1 teaspoon into each indentation. Bake for 12 to 15 minutes until edges are set. Cool on sheet 5 minutes then transfer to rack.
Last Step: Please leave a rating and comment letting us know how you liked this recipe! This helps our business to thrive and continue providing free, high-quality recipes for you.
Nutrition
Did You Make This?
Leave a comment & rating below or tag
@solushcooks on social media!
Categories:
You might also like...

Spaghetti Squash Mac & Cheese
A lighter take on a classic comfort favorite that swaps pasta for roasted spaghetti squash and keeps all the creamy, cheesy goodness with optional broccoli or chicken for extra heartiness.

Coconut Cream Pie Overnight Oats
A dreamy no-cook breakfast that tastes like coconut cream pie — creamy coconut milk, tangy Greek yogurt, shredded coconut, and optional banana make mornings feel indulgent and effortless.

Roasted Sweet Potato Rounds with Honey & Feta
Crisp-edged sweet potato rounds roasted until tender, finished with salty feta, a drizzle of honey, and fresh parsley—an effortless crowd-pleaser for gatherings or weeknights.
Did You Make This?
Leave a comment & rating below or tag @solushcooks on social media!
Rate This Recipe
Share This Recipe
Enjoyed this recipe? Share it with friends and family, and don't forget to leave a review!
Comments (1)
This recipe looks amazing! Can't wait to try it.
Comments are stored locally in your browser. Server comments are displayed alongside your local comments.

Hi, I'm Lena!
What's Popular

30-Minute Meals!
Join to receive our email series which contains a round-up of some of our quick and easy family favorite recipes.