
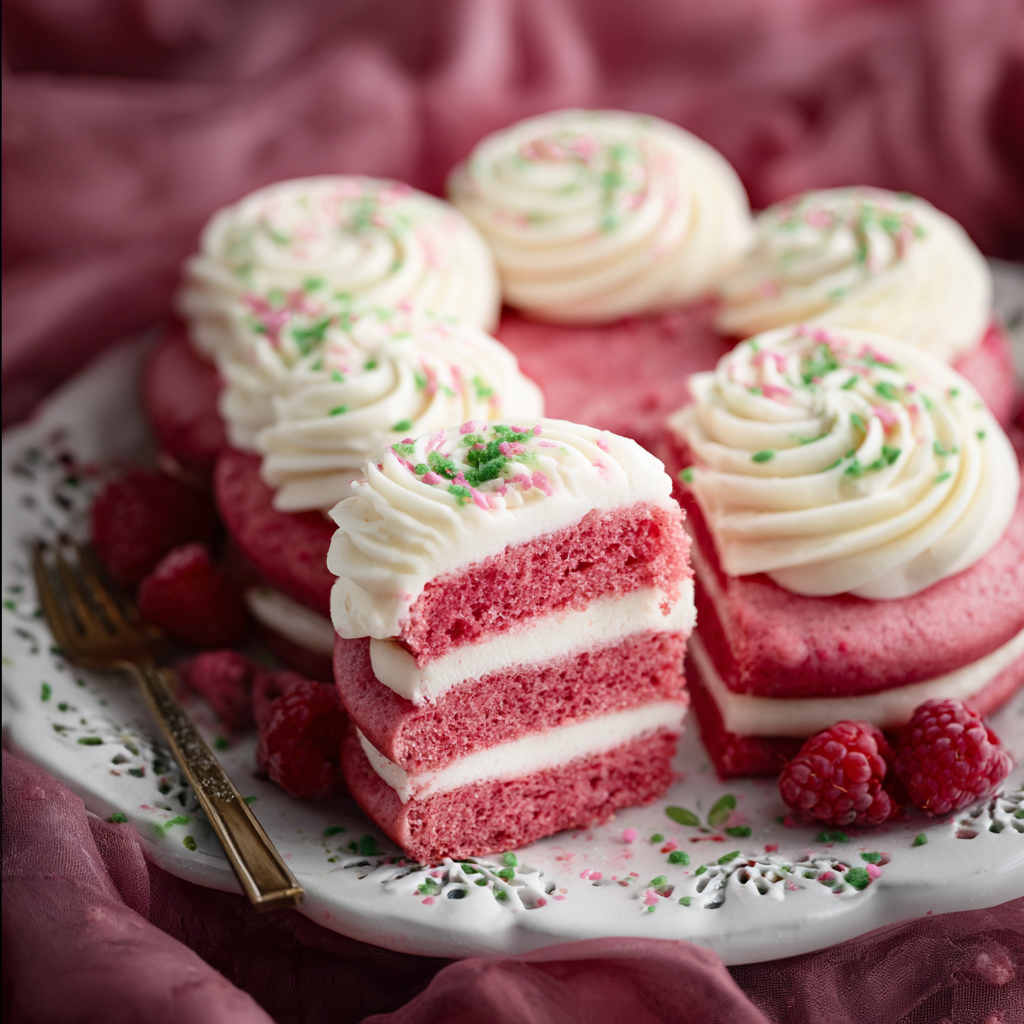
Pink Velvet Cakes

Soft, tender pink velvet layers topped with silky vanilla cream cheese frosting and festive sprinkles—perfect for holidays, parties, and sweet celebrations.
This Pink Velvet Cakes recipe has been my go-to when I want a show-stopping dessert that still feels comforting and familiar. I discovered this combination one December while testing holiday treats for a family party: I wanted something more delicate than red velvet but still festive. The crumb is moist and tender thanks to a generous amount of butter and careful creaming; the subtle flavoring adds a faint cake-batter note while the pink color brings joy to the table. My kids insisted I make it again the next week, and the leftovers disappeared by morning.
I love how the texture balances—the cake rises with a fine crumb and a gentle crumbly softness that melts on the tongue. The frosting is a classic cream cheese base enriched with butter for silkiness and just enough powdered sugar to balance tang and sweetness. When sliced, each piece shows a pale rose interior that pairs beautifully with bright sprinkles for holidays or a pastel palette for spring gatherings. This version is approachable for home bakers and scales well from cupcakes to layered cakes.
Why You'll Love This Recipe
- The texture is reliably tender and moist because of creaming the butter and sugar properly and using room-temperature ingredients for even incorporation.
- Quick assembly: batter comes together in one bowl in about 15 minutes, making it practical for busy hosts and last-minute celebrations.
- Uses pantry staples like all-purpose flour, granulated sugar, and baking powder—no specialty cocoa or buttermilk required.
- Versatile finishing: makes 12 cupcakes or an 8-inch two-layer cake and freezes well for make-ahead convenience.
- Family friendly: the mild cake-batter flavoring complements the tangy cream cheese frosting without overpowering picky palates.
- Holiday-ready: pink hue and Christmas sprinkles add instant festivity for seasonal gatherings.
I remember one holiday potluck when two neighbors asked for the recipe after the first bite; even my most cake-averse aunt had a second slice. That kind of reaction makes developing and sharing this recipe so rewarding—simple techniques yielding impressive results every time.
Ingredients
- Salted butter: Use 1 1/2 cups of high-quality salted butter, softened to room temperature. I like Land O Lakes or Plugra for consistent richness; butter provides flavor, tenderness, and structure when creamed with sugar.
- Granulated sugar: 1 1/2 cups; granulated sugar helps aerate the batter during creaming and contributes to a light crumb. Measure by spooning into the cup and leveling for accuracy.
- Eggs: 3 large eggs at room temperature. Room temperature eggs incorporate more evenly, improving emulsion and rise.
- Cake batter flavoring: 1 1/2 teaspoons—this gives a nostalgic, slightly vanilla-custard note. If you prefer, substitute with a combination of vanilla and almond extract (use less almond).
- Pink food coloring: A few drops of gel food coloring for concentrated color without watering down the batter. Add gradually until you reach the desired shade.
- All-purpose flour: 4 1/2 cups; I recommend King Arthur or another unbleached brand for consistent protein content that yields a tender crumb.
- Baking powder: 3 teaspoons; ensures a reliable rise and lightness without sourness, which buttermilk-based recipes can introduce.
- Frosting: For the vanilla cream cheese frosting combine 1/4 cup softened butter, 8 ounces cream cheese at room temperature, 2 teaspoons vanilla extract, 4 cups powdered sugar and a pinch of salt. Thin with milk or heavy cream as needed.
- Garnish: Christmas sprinkles or seasonal decorations to brighten the top. Use fine sprinkles for best adherence.
Instructions
Preheat and prepare pans:Preheat the oven to 350°F. Line cupcake tins with liners for 12 cupcakes or grease and flour two 8-inch round pans. Proper pan prep prevents sticking and promotes even browning. If baking two layers, chill pans slightly after greasing to reduce spreading.Cream butter and sugar:In a large bowl, beat 1 1/2 cups softened butter and 1 1/2 cups granulated sugar on medium-high speed for 3 to 4 minutes until pale and fluffy. This aerates the mixture, creating lift and a fine crumb. Scrape sides of the bowl occasionally for even mixing.Add eggs and flavoring:Beat in the eggs one at a time, fully incorporating each before adding the next to maintain emulsion. Add 1 1/2 teaspoons cake batter flavoring and 4 to 6 drops of pink gel coloring, mixing until uniformly tinted. Don’t overmix once eggs are added to avoid toughening the batter.Fold in dry ingredients:Sift together 4 1/2 cups all-purpose flour and 3 teaspoons baking powder. With the mixer on low, add the dry mix in three additions, alternating with a tablespoon or two of milk if the batter is too thick. Fold gently until just combined to keep the crumb tender.Portion and bake:Divide batter evenly—about 3 tablespoons per cupcake or pour into prepared cake pans. Bake cupcakes 18 to 22 minutes or layer cake 22 to 28 minutes at 350°F, until a toothpick inserted comes out clean and the top springs back slightly when touched.Cool completely:Let cupcakes cool in the pan for 5 minutes, then transfer to a wire rack. For layer cakes, cool in pans 10 minutes before inverting onto a rack. Cooling fully prevents frosting from melting and helps flavors settle.Make the frosting:Beat 1/4 cup softened butter and 8 ounces room-temperature cream cheese until smooth. Add 2 teaspoons vanilla, a pinch of salt, then gradually beat in 4 cups powdered sugar until desired sweetness and thickness. Thin with milk or heavy cream 1 teaspoon at a time if needed.Assemble and decorate:For layered cakes, spread a thin crumb coat, chill 15 minutes, then finish with a thicker final layer. For cupcakes, pipe or spread frosting and finish with Christmas sprinkles. Refrigerate briefly to set frosting if needed.
You Must Know
- These cakes keep well refrigerated for up to 4 days when stored in an airtight container; freeze unfrosted layers up to 3 months.
- The recipe is high in fat and moderate in sugar; a single serving contains substantial calories and provides energy but is an occasional treat.
- Use room-temperature cream cheese and butter to achieve a smooth frosting that won’t be grainy or lumpy.
- Gel food coloring provides vibrant color with minimal additional liquid, helping maintain batter consistency.
My favorite part is the way the cream cheese frosting balances the cake’s buttery sweetness with a pleasant tang, creating a rounded flavor profile. One holiday I swapped the sprinkles for candied rose petals and almond slivers; the texture contrast had guests reaching for the recipe. I also learned that chilling the frosted cake 20 minutes before slicing yields cleaner slices and less frosting smear, a trick I now use for every celebration.

Storage Tips
Store cooled cakes and cupcakes in an airtight container in the refrigerator for up to four days; the cool environment slows spoilage and keeps the cream cheese frosting stable. For longer storage, freeze unfrosted layers tightly wrapped in plastic and a layer of foil for up to three months. Thaw overnight in the refrigerator before bringing to room temperature to finish with frosting. To retain moisture when reheating individual slices, warm gently in a 300°F oven for 8 to 10 minutes wrapped in foil or microwave for 10 seconds on low, testing frequently to avoid melting the frosting.
Ingredient Substitutions
If you need to adjust ingredients, swap salted butter for unsalted and add 1/4 teaspoon salt to compensate. To make this dairy-free, use nondairy butter and a plant-based cream cheese that whips well, though texture and tang will differ slightly. For an egg-free option, try a commercial egg replacer following package ratios or use 3/4 cup applesauce combined with 1 teaspoon baking soda—expect a denser crumb. To reduce sweetness in the frosting, decrease powdered sugar by 1/2 cup and add a touch more salt.
Serving Suggestions
Present individual cupcakes on a tiered stand for parties or slice layered cakes on a wooden board with fresh berries and mint sprigs for color contrast. Pair with lightly brewed tea, sparkling rosé, or a bright citrus coffee to cut through richness. Garnish with toasted flaked almonds or edible flowers for an elevated look, or use seasonal sprinkles for holiday appeal. For kid-friendly events, pipe swirls of frosting and add a single large sprinkle in the center for a simple but charming finish.
Cultural Background
Velvet cakes trace their roots to the early 20th century as a variation on butter-based layer cakes that emphasized a fine, tender crumb. Red velvet gained fame through classic American baking traditions, while pink velvet is a playful modern interpretation that preserves the delicate texture without strong cocoa or buttermilk notes. This pastel variant often appears at baby showers, Valentine’s gatherings, and festive winter celebrations where color plays a symbolic or decorative role.
Seasonal Adaptations
For spring, accent the cakes with candied lemon zest and light citrus glaze instead of heavy frosting; summer calls for fresh berries between layers. At Christmas, use red and green sprinkles and a dusting of edible glitter for extra sparkle. You can also infuse the frosting with warm spices like cardamom or cinnamon for autumnal warmth. Small adjustments in garnish and flavoring can make the same base suitable year-round for different holidays and seasonal palettes.
Meal Prep Tips
Make the batter the night before and store it covered in the refrigerator; bring to room temperature and give a gentle stir before baking. Bake and freeze unfrosted layers or cupcakes, then thaw and frost the day of serving for best texture. Prepare the frosting ahead and chill; bring to room temperature and rewhip briefly to restore spreadable consistency. Use clear, labeled containers and stack layers with parchment rounds between to speed assembly on the day of your event.
There is a special satisfaction in bringing a simple set of ingredients together and producing something that sparks smiles. Whether you make these for a holiday, a birthday, or a quiet weekend indulgence, the Pink Velvet Cakes are forgiving, adaptable, and beautiful to share. Try customizing the hue and garnishes to make the recipe your own and enjoy the moments of delight it creates around the table.
Pro Tips
Bring eggs and dairy to room temperature for better emulsion and rise.
Use gel food coloring to avoid thinning the batter with liquid dyes.
Chill a crumb coat for 15 to 20 minutes before final frosting to reduce crumbs.
Use fine powdered sugar for a smoother frosting texture.
This nourishing pink velvet cakes recipe is sure to be a staple in your kitchen. Enjoy every moist, high protein slice — it is perfect for breakfast or as a wholesome snack any time.
FAQs about Recipes
How long should I bake these?
Bake cupcakes 18 to 22 minutes and 8-inch layer cakes 22 to 28 minutes at 350°F. Insert a toothpick to check doneness.
Can I freeze the cake?
Yes, you can freeze unfrosted layers up to 3 months. Wrap tightly in plastic and foil. Thaw overnight in the refrigerator before frosting.
Tags
Pink Velvet Cakes
This Pink Velvet Cakes recipe makes perfectly juicy, tender, and flavorful steak every time! Serve with potatoes and a side salad for an unforgettable dinner in under 30 minutes.
Ingredients
Cake
Vanilla Cream Cheese Frosting
Garnish
Instructions
Preheat and prepare pans
Preheat oven to 350°F. Line cupcake tins or prepare two 8-inch rounds by greasing and lightly flouring to prevent sticking.
Cream butter and sugar
Beat 1 1/2 cups softened butter with 1 1/2 cups granulated sugar for 3 to 4 minutes until pale and fluffy to incorporate air for lift.
Add eggs and flavoring
Add eggs one at a time, mixing fully after each, then add cake batter flavoring and pink gel food coloring until evenly tinted.
Mix dry ingredients
Sift together flour and baking powder. Add dry mix to wet ingredients in three additions, folding gently to avoid overworking the batter.
Portion and bake
Fill cupcake cups about two thirds full or pour batter into prepared pans. Bake cupcakes 18 to 22 minutes or layers 22 to 28 minutes until a toothpick comes out clean.
Cool completely
Cool cupcakes in the tin 5 minutes, then transfer to a rack. Cool layers 10 minutes in pans before inverting to avoid breakage and ensure stable frosting.
Make and apply frosting
Beat 1/4 cup butter with 8 ounces cream cheese, add vanilla, then gradually beat in powdered sugar. Thin with milk if needed and frost cooled cakes.
Last Step: Please leave a rating and comment letting us know how you liked this recipe! This helps our business to thrive and continue providing free, high-quality recipes for you.
Nutrition
Did You Make This?
Leave a comment & rating below or tag
@solushcooks on social media!
Categories:
You might also like...

Spaghetti Squash Mac & Cheese
A lighter take on a classic comfort favorite that swaps pasta for roasted spaghetti squash and keeps all the creamy, cheesy goodness with optional broccoli or chicken for extra heartiness.

Coconut Cream Pie Overnight Oats
A dreamy no-cook breakfast that tastes like coconut cream pie — creamy coconut milk, tangy Greek yogurt, shredded coconut, and optional banana make mornings feel indulgent and effortless.

Roasted Sweet Potato Rounds with Honey & Feta
Crisp-edged sweet potato rounds roasted until tender, finished with salty feta, a drizzle of honey, and fresh parsley—an effortless crowd-pleaser for gatherings or weeknights.
Did You Make This?
Leave a comment & rating below or tag @solushcooks on social media!
Rate This Recipe
Share This Recipe
Enjoyed this recipe? Share it with friends and family, and don't forget to leave a review!
Comments (1)
This recipe looks amazing! Can't wait to try it.
Comments are stored locally in your browser. Server comments are displayed alongside your local comments.

Hi, I'm Lena!
What's Popular

30-Minute Meals!
Join to receive our email series which contains a round-up of some of our quick and easy family favorite recipes.