
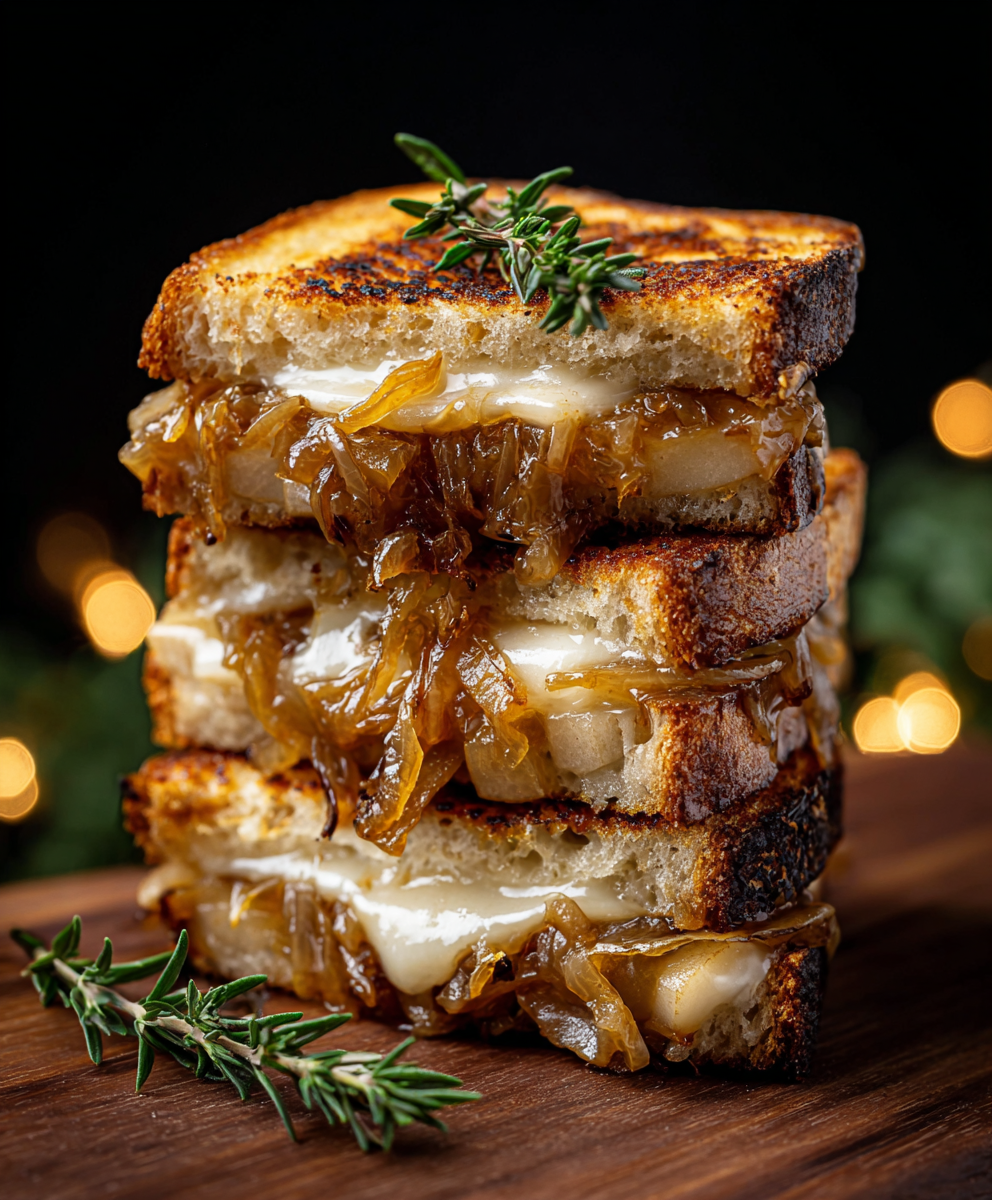
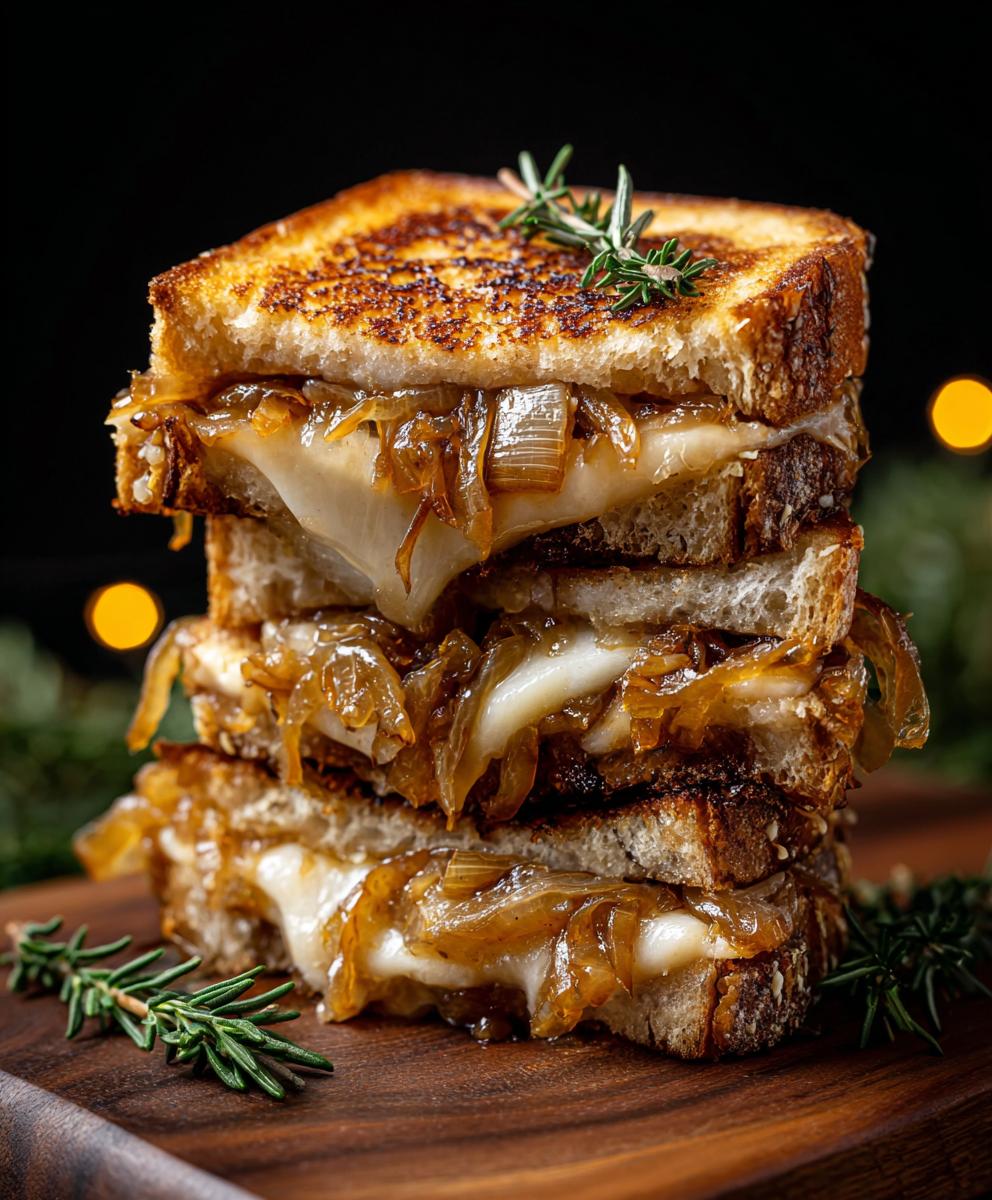
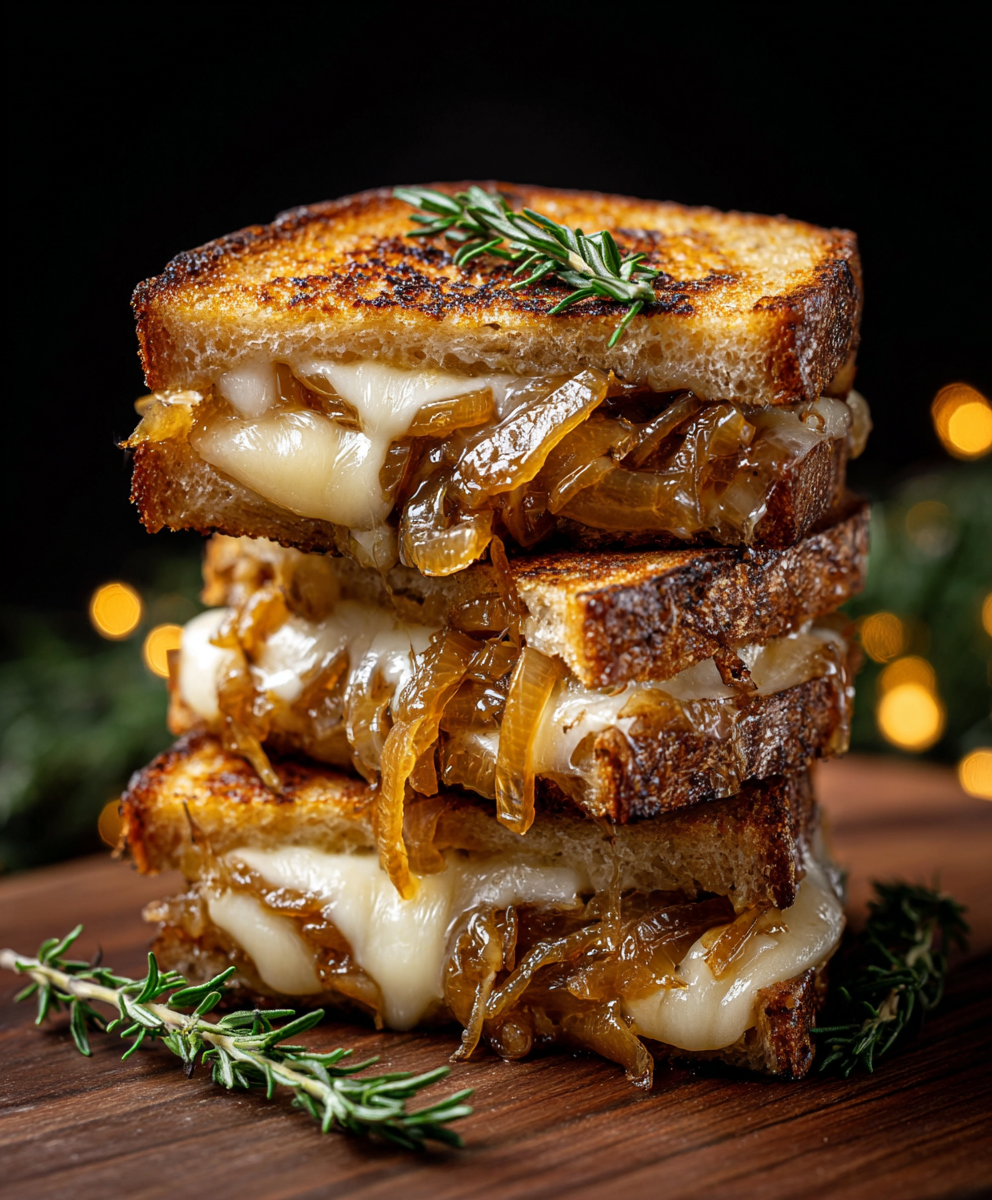
Pear & Apple Grilled Cheese With Caramelized Onions

A sweet-savory grilled cheese that pairs crisp pear and apple with tangy balsamic caramelized onions and sharp cheddar on toasted sourdough.
This pear and apple grilled cheese with caramelized onions has become my favorite quick comfort meal for chilly evenings and rushed weekends. I first put these flavors together on a rainy Sunday when the fridge offered only a ripe pear, a crisp apple, and a half block of sharp cheddar. The contrast — sweet fruit, tangy balsamic onions, and nutty, melting cheddar — surprised me with its sophistication despite its simplicity. It’s a sandwich that feels indulgent yet balanced: not too sweet, pleasantly savory from the browned onions, and perfectly crunchy from thick sourdough slices.
I discovered how well the thin fruit slices soften slightly under heat while keeping a tiny bit of bite, which adds an elegant texture against the gooey cheese. The caramelized onions bring depth — a savory backbone that ties the fruit and cheese together. Months later this sandwich has shown up at late-night study sessions, impromptu lunches, and as a supper for friends who just want something warm and memorable. It’s the kind of preparation that turns pantry odds-and-ends into a dish people ask about again and again.
Why You'll Love This Recipe
- Sweet and savory interplay: crisp pear and apple meet sharp cheddar and tangy balsamic onions for a layered flavor experience.
- Quick to assemble: active prep is about 12 minutes; hands-on cooking totals roughly 20–25 minutes for two sandwiches.
- Uses pantry and produce staples: sourdough, one onion, a pear and an apple, and a block of cheddar is all you need.
- Make-ahead friendly: caramelized onions can be prepared up to 3 days in advance to save time on busy nights.
- Crowd-pleaser: familiar grilled-cheese comfort with a grown-up twist that suits brunch, lunch, or a simple dinner.
- Customizable: swap cheeses, use gluten-free bread, or add herbs to suit dietary needs or seasonal produce.
When I first served these to my family, everyone paused mid-bite — then asked for seconds. The first time I made them for guests, the caramelized onions were the conversation starter: people wanted to know how they got so sweet and glossy. This sandwich represents the kind of discovery I enjoy most in the kitchen: a few smart techniques and modest ingredients that together feel like something I’d order at a cozy café.
Ingredients
- Sourdough bread (4 slices): Choose a rustic, medium-thick slice from a bakery or grocery bakery; it toasts evenly and holds up to the fillings without sogging.
- Unsalted butter (2 tablespoons): Use real butter for browning and flavor; unsalted lets you control seasoning and prevents oversalting near the cheese.
- Pear (1 medium): A Bartlett or Anjou works best — choose one that’s ripe but still firm so it softens without turning to mush in the pan.
- Apple (1 medium): Honeycrisp or Fuji bring crisp texture and balanced sweetness; peel if you prefer a softer mouthfeel.
- Onion (1 medium): Yellow onion caramelizes nicely — slice thinly so it cooks evenly and sweetens during the process.
- Sharp cheddar (1 cup shredded): Buy a block and shred it yourself for the most reliable melt and cleaner flavor; pre-shredded can contain anti-caking agents.
- Balsamic vinegar (1 tablespoon): A good everyday balsamic gives brightness to the caramelized onions — not aged balsamic, just a balanced bottle.
- Salt and black pepper: Season the onions and the assembled sandwich lightly; coarse salt and freshly cracked black pepper make a noticeable difference.
Instructions
Caramelize the onions: Heat a medium skillet over medium heat and add 1 tablespoon of butter. Add the thinly sliced onion and a pinch of salt to help draw out moisture. Stir occasionally and allow the onions to soften and turn golden brown, about 8–12 minutes. Watch closely toward the end so they brown evenly and don’t burn. When they are glossy and deeply colored, stir in 1 tablespoon of balsamic vinegar, cook for another 2–3 minutes until the vinegar reduces slightly, then transfer the onions to a bowl and set aside. Prepare the fruit and cheese: While the onions cook, thinly slice the pear and apple — aim for uniform slices about 1/8 to 1/6 inch thick so they warm through quickly without collapsing. Shred the sharp cheddar if you haven’t already. Have the remaining tablespoon of butter ready to melt in the skillet for toasting. Assemble the sandwiches: On two slices of sourdough, sprinkle half of the shredded cheddar in an even layer. Spoon an even distribution of the caramelized onions over the cheese, then overlap apple slices and pear slices in a single layer so every bite has fruit. Top with the remaining cheddar and close with the other bread slices. Press lightly to compact the layers for an even toast. Grill and finish: Return the skillet to medium heat and melt the remaining tablespoon of butter, swirling to coat. Place one sandwich in the skillet and grill for 4–5 minutes per side, pressing gently with a spatula and watching for a deep golden crust. Flip carefully and cook the second side until the cheese is thoroughly melted, about another 4–5 minutes. Repeat with the second sandwich. Remove to a cutting board, let rest one minute, then slice and serve while warm.
You Must Know
- The onions can be cooked in advance and refrigerated for up to 3 days; reheat gently before assembling.
- Use block cheddar shredded fresh for a smoother melt; pre-shredded often has anti-caking agents that reduce creaminess.
- This keeps well for reheating; wrap tightly and warm in a skillet or toaster oven rather than microwave for best texture.
- For crisper bread, cook slightly longer at lower heat to allow cheese to melt without burning the crust.
My favorite aspect of this combination is the way the balsamic lifts the caramelized onions so they don’t feel cloying next to the fruit. Family members notice the little savory layers — the onions, the cheese, the fruit — and always comment on how elegant a simple sandwich can feel. It’s a great demonstration that technique — slow onion browning and even slicing — turns ordinary ingredients into something special.
Storage Tips
Store any leftover grilled sandwiches wrapped tightly in plastic wrap or an airtight container in the refrigerator for up to 2 days. To reheat, unwrap and warm in a skillet over low heat, covered for 3–5 minutes per side until warmed through and the cheese re-liquefies. Alternatively, reheat in a 350°F (175°C) oven on a baking sheet for about 8–10 minutes. Frozen assembled sandwiches are not recommended because the fruit softens; however, the caramelized onions freeze well for up to 3 months in a freezer-safe container and thaw quickly in the refrigerator overnight.
Ingredient Substitutions
If you need a dairy-free option, substitute a plant-based buttery spread for the pan and use a dairy-free melting cheese; note the flavor profile will be less sharp unless the plant-based cheese is specifically flavored. For a gluten-free approach, use sturdy gluten-free sourdough-style slices that can stand up to grilling. Swap cheddar for Gruyère or fontina for nuttier, more complex melting characteristics. If pears are out of season, ripe peaches or thin slices of ripe mango provide a sweet, juicy alternative with a slightly different texture.
Serving Suggestions
Serve the sandwiches halved on a wooden board with a crisp side salad of peppery arugula dressed in lemon vinaigrette to cut the richness. A simple pickled vegetable or cornichons adds a bright counterpoint. For brunch, pair with a warm bowl of tomato bisque or roasted tomato soup; the acidity of the soup balances the sweet fruit. Garnish with a few microgreens or a light drizzle of aged balsamic on the plate for a refined touch.
Cultural Background
Grilled cheese is a classic comfort concept found in many cuisines — bread and melted cheese are universal — but pairing fruit with cheese and caramelized onions nods to European traditions where fruit and cheese are commonly served together. The balsamic addition echoes Italian flavor accents, while the technique of slow-caramelizing onions is a French-inspired step that elevates the base sandwich into a bistro-ready offering. This meld of influences is why the sandwich feels both familiar and sophisticated.
Seasonal Adaptations
In autumn, choose crisp pears and late-season apples; add a sprinkle of toasted chopped walnuts for texture. In summer, use thinly sliced stone fruit and fresh basil. For winter, swap in roasted beets or thin slices of roasted butternut squash for fruitiness with roast-y depth. Adjust the onion cooking time slightly if adding sturdier roasted vegetables so everything warms evenly without overcooking the fruit or melting the cheese too quickly.
Meal Prep Tips
Caramelize a double batch of onions on the weekend and refrigerate in a sealed container for quick assembly during the week. Pre-slice fruit and keep in a paper-towel-lined container to reduce moisture, using slices within a day for best texture. Assemble sandwiches without toasting and store separated in the fridge; when ready to eat, press and grill directly from cold for a few extra minutes per side to ensure the cheese melts through.
Comforting, quick, and adaptable, this pear and apple grilled cheese with caramelized onions is a utility player in your weeknight roster. Make it your own with cheese swaps or seasonal fruit, and enjoy the warm, layered flavors that turn a simple sandwich into a small celebration of home cooking.
Pro Tips
Thin, uniform fruit slices help heat evenly and avoid mushy centers — aim for about 1/8 to 1/6 inch thickness.
Shred cheese from a block for better melt and flavor compared with pre-shredded options.
Cook onions low and slow until deeply colored for the best sweetness; resist the urge to rush with high heat.
Press gently with a spatula while grilling to compact layers and promote even browning and melting.
This nourishing pear & apple grilled cheese with caramelized onions recipe is sure to be a staple in your kitchen. Enjoy every moist, high protein slice — it is perfect for breakfast or as a wholesome snack any time.
FAQs about Recipes
Can I prepare the caramelized onions in advance?
Yes. Caramelized onions can be made up to 3 days ahead and stored in an airtight container in the refrigerator.
How should I reheat leftovers without losing texture?
Use a low oven or a skillet warming at low heat with a lid; avoiding the microwave keeps the bread from becoming soggy and helps maintain a crisp crust.
Tags
Pear & Apple Grilled Cheese With Caramelized Onions
This Pear & Apple Grilled Cheese With Caramelized Onions recipe makes perfectly juicy, tender, and flavorful steak every time! Serve with potatoes and a side salad for an unforgettable dinner in under 30 minutes.
Ingredients
For the sandwiches
Instructions
Caramelize the onions
Melt 1 tablespoon of butter in a skillet over medium heat. Add thinly sliced onion with a pinch of salt and cook, stirring occasionally, until golden and soft, about 8–12 minutes. Add 1 tablespoon balsamic vinegar and cook 2–3 more minutes. Remove and set aside.
Prepare fruit and cheese
Thinly slice the pear and apple to uniform thickness (about 1/8 to 1/6 inch). Shred the sharp cheddar if needed and have remaining butter ready for toasting.
Assemble the sandwiches
On two slices of sourdough, layer half the cheddar, an even portion of caramelized onions, apple slices, pear slices, then remaining cheddar. Top with the other bread slices and press lightly.
Grill the sandwiches
Melt remaining 1 tablespoon butter in the skillet over medium heat. Grill each sandwich 4–5 minutes per side until deep golden and cheese is melted, pressing gently with a spatula.
Last Step: Please leave a rating and comment letting us know how you liked this recipe! This helps our business to thrive and continue providing free, high-quality recipes for you.
Nutrition
Did You Make This?
Leave a comment & rating below or tag
@solushcooks on social media!
Categories:
You might also like...

Spaghetti Squash Mac & Cheese
A lighter take on a classic comfort favorite that swaps pasta for roasted spaghetti squash and keeps all the creamy, cheesy goodness with optional broccoli or chicken for extra heartiness.

Coconut Cream Pie Overnight Oats
A dreamy no-cook breakfast that tastes like coconut cream pie — creamy coconut milk, tangy Greek yogurt, shredded coconut, and optional banana make mornings feel indulgent and effortless.

Roasted Sweet Potato Rounds with Honey & Feta
Crisp-edged sweet potato rounds roasted until tender, finished with salty feta, a drizzle of honey, and fresh parsley—an effortless crowd-pleaser for gatherings or weeknights.
Did You Make This?
Leave a comment & rating below or tag @solushcooks on social media!
Rate This Recipe
Share This Recipe
Enjoyed this recipe? Share it with friends and family, and don't forget to leave a review!
Comments (1)
This recipe looks amazing! Can't wait to try it.
Comments are stored locally in your browser. Server comments are displayed alongside your local comments.

Hi, I'm Lena!
What's Popular

30-Minute Meals!
Join to receive our email series which contains a round-up of some of our quick and easy family favorite recipes.