
>>

A light, protein-packed alternative to tortillas: thin baked cottage cheese wraps that are easy to make, versatile, and perfect for breakfast, lunch, or a quick dinner.

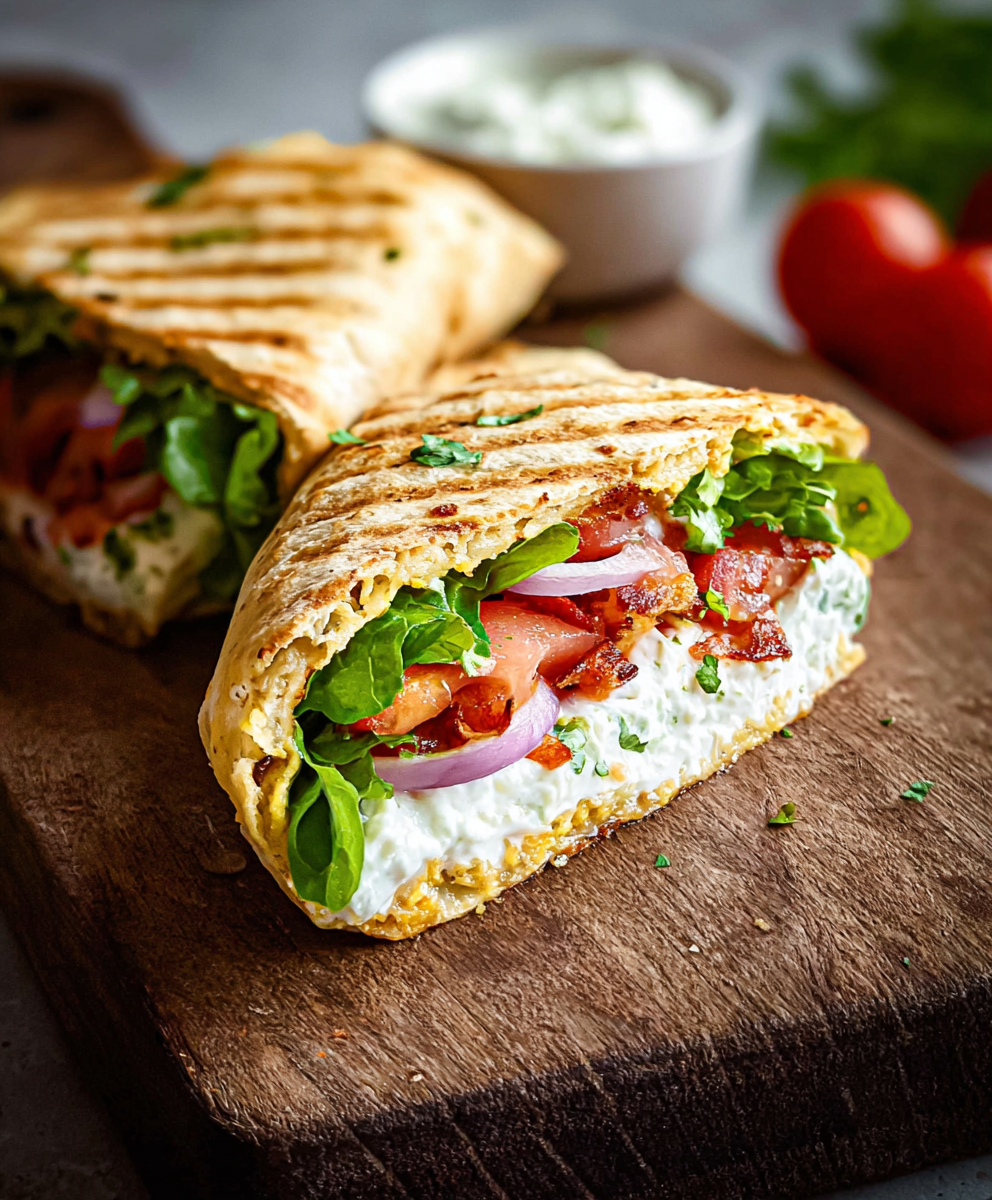
This simple cottage cheese wrap transformed our quick-lunch routine the first time I baked it. I discovered the idea on a crowded week when pantry staples and a craving for something light collided; blending full-fat cottage cheese with eggs and a little Parmesan produced a silky batter that bakes into a pliable, savory sheet. It crisps slightly at the edges yet stays tender and flexible when cooled, making it ideal for rolling around fresh vegetables, roasted proteins, or creamy spreads. The first bite—savory, cheesy, and subtly herbed—made me set aside tortillas for good on many busy days.
I love this variation because it leans on ingredients most of us keep on hand: cottage cheese, eggs, and a handful of seasonings. It’s fast to prepare, bakes unattended, and becomes a portable meal that works at the table, in a lunchbox, or alongside a big salad. Family members who once insisted on store-bought wraps were surprised to find these just as satisfying, with the bonus of more protein and fewer processed ingredients. The texture is an appealing cross between a delicate flatbread and a thin omelet, and the flavor pairs beautifully with bright, acidic fillings that cut through the dairy richness.
On the first night I served these, my partner loaded a wrap with sliced roasted red pepper, baby spinach, and a smear of pesto and declared it a new favorite. Kids liked cutting smaller roll-ups with deli turkey and thin cucumber slices—simple, fast, and almost universally liked.
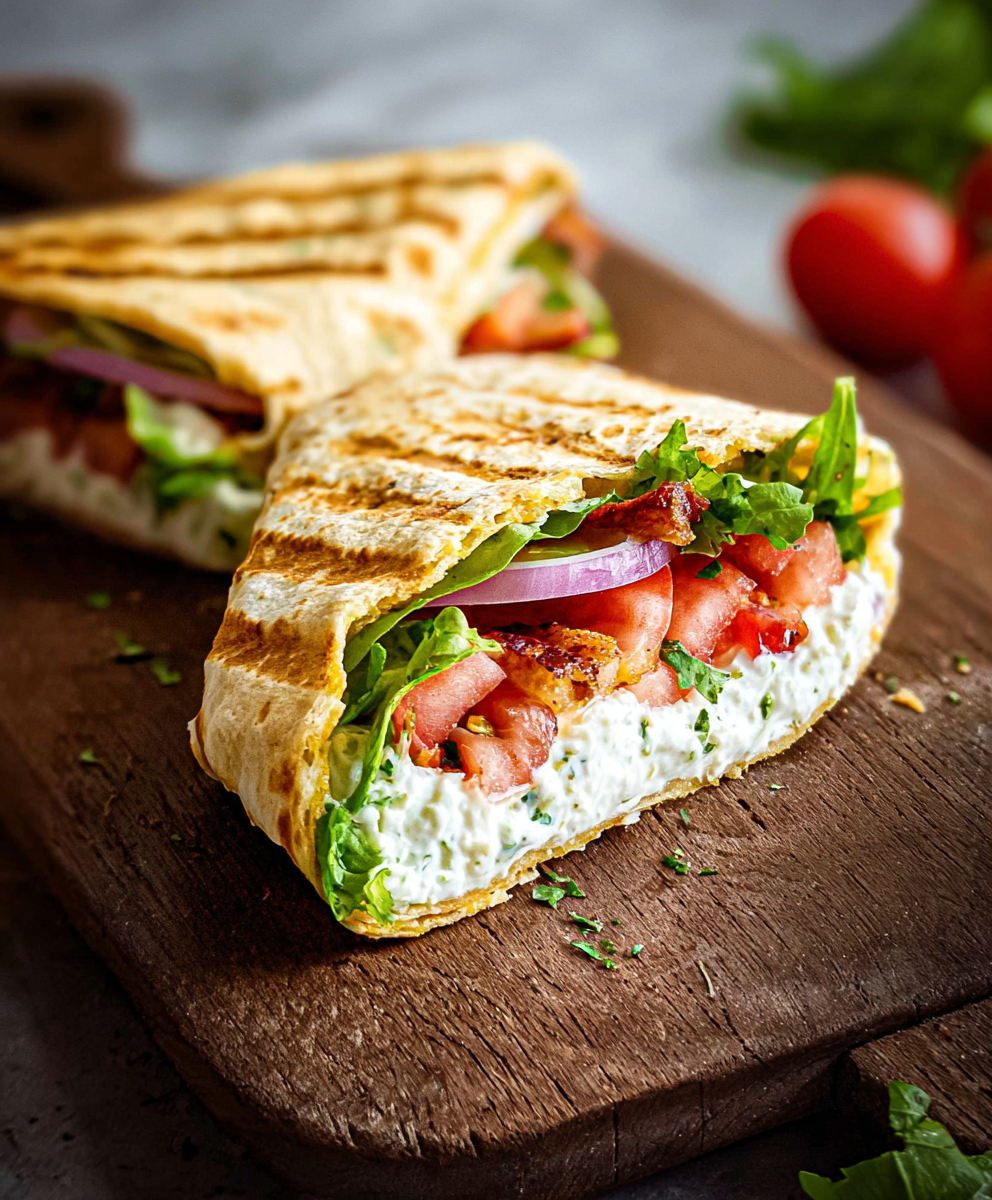
What I love most is how adaptable the finished sheet is: early on I filled one with leftover barbecue chicken and a slaw, and the contrast of tangy sauce with creamy cottage-cheese work felt unexpectedly balanced. Friends who tried it appreciated the cleaner ingredient list compared to shop-bought wraps, while kids enjoyed rolling the smaller pieces with sliced turkey and cheese.
Store cooled sheets in an airtight container or wrapped tightly in plastic wrap in the refrigerator for up to 3 days. For longer storage, place individual wrapped sections in a freezer-safe bag and freeze for up to one month—thaw in the refrigerator overnight and bring to room temperature before filling. When reheating, a quick 20–30 second warm-up in a microwave or a brief toast in a skillet helps restore pliability; avoid overheating to prevent drying out. Use parchment between layers to prevent sticking.
If you prefer a slightly tangier sheet, swap half the Parmesan for grated Pecorino Romano. For a nuttier flavor, add 1 tablespoon of almond flour to the batter—this will slightly change texture but keeps it low-carb. Low-fat cottage cheese can be used, but expect a drier, firmer result; add 1 tablespoon of olive oil or 2 tablespoons of Greek yogurt to restore tenderness. Omit garlic powder for a milder base or replace Italian seasoning with fresh chopped basil for a fresher green note.
Serve warm or room temperature: for breakfast, spread with cream cheese, smoked salmon, capers, and dill; for lunch, stuff with grilled vegetables, roasted chicken, and a drizzle of balsamic; for a party, slice into small roll-ups with cream cheese and thinly sliced ham. Garnish with microgreens or a sprinkle of extra grated Parmesan for presentation. They pair well with crisp salads, quick pickles, or a simple tomato-cucumber salad to add bright acidity.
Spring and summer calls for bright fillings—think asparagus, pea shoots, fresh herbs, and lemon zest. In autumn, fill with roasted root vegetables, caramelized onions, and a smear of mustard. For winter comfort, warm shredded turkey or pulled pork with sautéed greens and a touch of cranberry relish works beautifully. Swap Italian seasoning for warm spices in holiday variations—a pinch of nutmeg and rosemary can make for a festive savory wrap.
Make a double batch and chill individual portions for grab-and-go lunches. Keep fillings separate until service to avoid sogginess—pack sliced vegetables, proteins, and spreads in divided containers. Assemble just before eating; if you must assemble ahead, put wetter items like tomatoes in a small side container. Use leakproof silicone containers for transport and an insulated lunch bag with an ice pack for safety if eating several hours later.
These wraps are a wonderful example of how a few simple pantry staples can produce something versatile and satisfying. Whether you’re feeding a crowd or packing a lunch, the combination of creamy cottage cheese, eggs, and Parmesan delivers a simple, flavorful base that invites creativity and customization.
Blend the batter until completely smooth to avoid holes in the baked sheet.
Cool the sheet fully before peeling to prevent tearing and achieve maximum flexibility.
Use fresh-grated Parmesan for best melt and flavor; pre-grated powders can be grainy.
Spread the batter evenly to ensure uniform baking and pliability.
Store with parchment between layers to prevent sticking when refrigerated or frozen.
This nourishing cottage cheese wraps recipe is sure to be a staple in your kitchen. Enjoy every moist, high protein slice — it is perfect for breakfast or as a wholesome snack any time.
This Cottage Cheese Wraps recipe makes perfectly juicy, tender, and flavorful steak every time! Serve with potatoes and a side salad for an unforgettable dinner in under 30 minutes.
Preheat oven to 350°F (175°C) and line a large baking sheet with parchment paper. Smooth the parchment to avoid ridges and ensure even baking.
Combine cottage cheese, eggs, Parmesan, garlic powder, and Italian seasoning in a blender or food processor. Blend for about 60 seconds until the mixture is silky and pourable, scraping the sides if necessary.
Pour the batter onto the prepared tray and use a silicone spatula to spread into a thin, uniform rectangle about 10x12 inches and 1/8 to 1/4 inch thick to ensure pliability.
Bake in the center of the oven for 30–35 minutes. The surface should be set and lightly golden. If the center is still wet at 30 minutes, extend baking by 5–8 minutes.
Allow the sheet to cool completely on the tray, about 10–20 minutes, to firm up. Carefully peel off the parchment; if it resists, let it cool a bit longer to avoid tearing.
Cut into 2 large sections or smaller strips for roll-ups. Fill with desired ingredients—greens, roasted vegetables, deli meats, or spreads—and serve immediately or store for later assembly.
Last Step: Please leave a rating and comment letting us know how you liked this recipe! This helps our business to thrive and continue providing free, high-quality recipes for you.
Leave a comment & rating below or tag
@solushcooks on social media!

A lighter take on a classic comfort favorite that swaps pasta for roasted spaghetti squash and keeps all the creamy, cheesy goodness with optional broccoli or chicken for extra heartiness.

A dreamy no-cook breakfast that tastes like coconut cream pie — creamy coconut milk, tangy Greek yogurt, shredded coconut, and optional banana make mornings feel indulgent and effortless.

Crisp-edged sweet potato rounds roasted until tender, finished with salty feta, a drizzle of honey, and fresh parsley—an effortless crowd-pleaser for gatherings or weeknights.
Leave a comment & rating below or tag @solushcooks on social media!
Enjoyed this recipe? Share it with friends and family, and don't forget to leave a review!
This recipe looks amazing! Can't wait to try it.
Comments are stored locally in your browser. Server comments are displayed alongside your local comments.

Join to receive our email series which contains a round-up of some of our quick and easy family favorite recipes.
