
Candy Cane Cookies

Buttery, peppermint-scented cookies shaped and striped like classic candy canes — festive, simple to make, and perfect for gifting or holiday cookie swaps.

This holiday candy cane cookie recipe is my go-to when I want something both nostalgic and show-stopping. I first developed this method during a December when I wanted to recreate the striped candy look without complicated cutters or advanced pastry techniques. The result is a tender, buttery cookie with a clean peppermint lift and candy-cane visuals that make every plate feel festive. I discovered how forgiving the dough is — it holds stripes beautifully, tolerates a short chill, and bakes into a soft yet slightly crisp edge that makes the peppermint flavor sing.
These treats matter because they look like a craft project but behave like a reliable family favorite. The texture sits between a classic cutout and a shortbread: rich from butter, sweet from powdered sugar, and gently fragrant from peppermint and vanilla. I remember taking a batch to a church holiday brunch and watching everyone guess how I made the stripes — the surprise when I said "rolled and twisted" was priceless. Little hands love helping shape the canes, and adults appreciate the refined peppermint finish.
Why You'll Love This Recipe
- Festive presentation without specialty tools: no candy-cane cutters required — the striped look is created by rolling two dough ropes and twisting them together for authentic stripes.
- Quick to prepare: active mixing and shaping take about 20 minutes, with optional chilling; ready to slice and bake within an hour if you skip extended chill.
- Pantry-friendly ingredients: uses common items like unsalted butter, powdered sugar, all-purpose flour, and basic extracts — perfect for last-minute holiday baking.
- Kid-friendly assembly: shaping is hands-on and simple, making this a great project for family cookie afternoons or classroom parties.
- Customizable flavor intensity: peppermint extract amount can be adjusted for a subtle or bold mint note, and red gel coloring keeps the stripes vivid without watering down dough.
Personally, my favorite memory is bringing a container of these cookies to a neighbor's tree trimming night. They disappeared faster than I expected, and someone complemented the texture — a soft center with a delicate edge — which is exactly the balance I aim for when adapting short-doughs for cookies.
Ingredients
- Unsalted butter (1 cup): Use high-quality, real butter (for example Kerrygold or a trusted local brand) at room temperature so it creams smoothly with the powdered sugar; butter provides rich flavor and crisp edges when baked.
- Powdered sugar (1 cup): Also known as confectioners' sugar; it dissolves into the butter for a tender, melt-in-your-mouth texture — Sift if lumpy for the smoothest dough.
- Egg (1 large): Room temperature egg binds the dough and adds structure; taking it out of the fridge 30 minutes before mixing will help it incorporate evenly.
- Vanilla extract (1 tsp): Preferably pure vanilla (Nielsen-Massey or McCormick Pure Vanilla) for depth of flavor that complements peppermint without overpowering it.
- Peppermint extract (1/2 tsp): Use a concentrated extract rather than an oil for a clean, sweet mint note; reduce if sensitive to intense mint flavors.
- All-purpose flour (2 1/2 cups): King Arthur or Gold Medal works well; measure by spooning into the cup and leveling to avoid dense dough.
- Salt (1/2 tsp): Balances sweetness and enhances the butter flavor — use fine sea salt or table salt.
- Red food coloring (gel): Gel color gives vivid stripes with minimal liquid; use a small amount to avoid altering dough consistency.
Instructions
Prep the Mixing: Preheat the oven to 350°F. Line baking sheets with parchment paper and set aside. Take the butter out of the refrigerator at least 30 minutes before so it reaches room temperature; it should be soft enough to press a finger into but not greasy. Cream Butter and Sugar: In a large bowl, beat 1 cup softened unsalted butter with 1 cup powdered sugar until pale and fluffy, about 2–3 minutes with a hand mixer or 1–2 minutes with a stand mixer on medium speed. Scrape the bowl frequently to ensure even mixing and avoid overbeating, which can incorporate too much air. Incorporate Egg and Extracts: Add 1 large room-temperature egg, 1 teaspoon vanilla extract, and 1/2 teaspoon peppermint extract. Beat just until combined; over-mixing after adding egg can toughen the dough. The dough should be cohesive but not sticky. Combine Dry Ingredients: Whisk together 2 1/2 cups all-purpose flour and 1/2 teaspoon salt in a separate bowl. Add the dry mix to the wet ingredients in two additions, mixing on low until just incorporated. The dough will be soft and pliable. Divide and Color: Divide the dough into two portions: roughly one-third for the red portion and two-thirds for the white portion. Knead gel red food coloring into the smaller portion until evenly colored — use gloves or a spatula to avoid staining. If the colored dough becomes too soft, chill for 10 minutes. Form Logs and Create Stripes: On a lightly floured surface, roll the white portion into two equal ropes about 3/4 inch thick and the red portion into one rope of the same thickness. Place the ropes side by side (white, red, white), gently press together, then twist once or twice and roll lightly to fuse into a single striped rope. For candy-cane shapes, bend one end into a hook; for rounds, chill the rope for 15–20 minutes and slice into 1/4–1/2 inch rounds. Chill Before Baking (Optional but Helpful): For clean edges and better hold, chill shaped cookies on the baking sheet for 15–30 minutes. This reduces spreading and keeps stripes distinct. If you prefer a tenderer cookie, you may skip the longer chill and bake immediately. Bake: Bake at 350°F for 9–11 minutes, rotating the pan halfway through. Cookies should be set around the edges but still pale in the center for a soft interior. Allow to cool on the sheet for 5 minutes, then transfer to a rack to cool completely.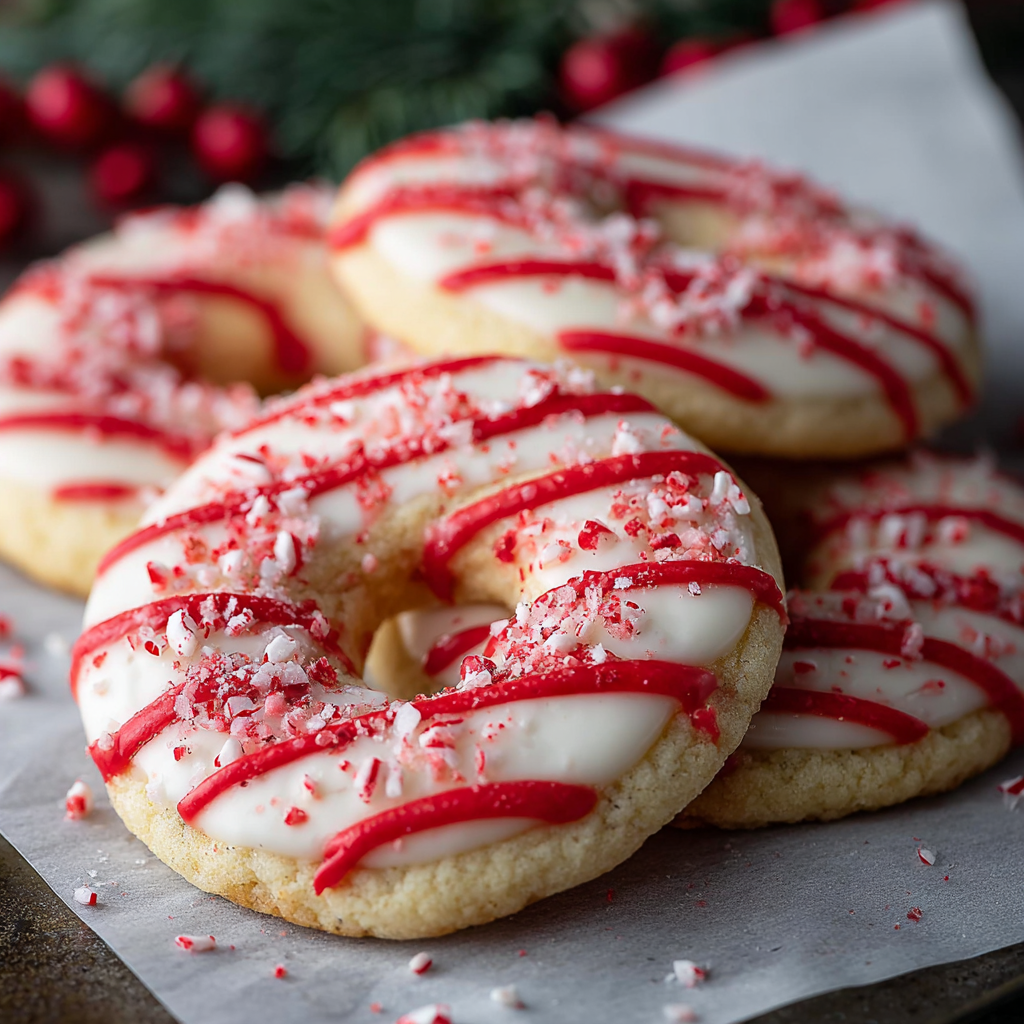
You Must Know
- These cookies freeze exceptionally well. Chill shaped dough ropes, wrap tightly, and freeze up to 3 months; slice and bake from frozen, adding 1–2 minutes to bake time.
- Adjust peppermint intensity: 1/2 teaspoon gives a bright, balanced mint; reduce to 1/4 teaspoon for a subtler note or increase slightly for more punch.
- Gel food coloring prevents extra moisture in the dough; avoid liquid red food coloring which can make dough sticky and cause spreading during baking.
- Yield and size: this batch makes approximately 24 medium 2-inch cookies when sliced; adjust slice thickness for more or fewer cookies.
My favorite aspect is how this simple shaping technique yields a professional-looking cookie with minimal fuss. Years of testing taught me that a short chill and a steady hand while rolling are the secrets; other than that, the dough is forgiving. Family and friends often ask for the method rather than the recipe because the stripes feel like a trick but are straightforward to reproduce.
Storage Tips
Store completely cooled cookies in an airtight container at room temperature for up to 5 days. Place a sheet of parchment between layers to protect the stripes and prevent sticking. For longer storage, freeze baked cookies in a single layer on a sheet until solid, then transfer to a freezer-safe container with parchment between layers; they keep well for up to 3 months. To refresh slightly soft cookies, heat in a 300°F oven for 3–4 minutes — this tightens edges and revives texture without dulling peppermint flavor.
Ingredient Substitutions
If you need to swap ingredients, use light brown sugar in place of a portion of powdered sugar for a chewier texture, but reduce the amount slightly to account for moisture. For a dairy-free version, substitute a vegan stick butter and a flax egg (1 tablespoon ground flax + 3 tablespoons water, chilled) though the flavor and edge crispness will shift slightly. If you prefer chocolate-striped canes, replace red food coloring with cocoa powder: reduce flour by 1–2 tablespoons and add 1–2 tablespoons unsweetened cocoa to the cocoa rope.
Serving Suggestions
Serve on a festive platter with peppermint bark, shortbread, and hot cocoa for a coordinated holiday spread. These cookies pair beautifully with a cup of black tea or a creamy latte; for adults, offer them alongside an after-dinner peppermint martini or a coffee with a splash of peppermint syrup. Garnish with a dusting of sifted powdered sugar or a few crushed peppermint candies for texture, but keep candy bits aside if packing for travel to avoid sticky residue.
Cultural Background
The candy cane shape is an iconic seasonal symbol in Western holiday traditions, believed to date back to 17th-century Europe where white sugar sticks were bent to resemble shepherd's crooks. Over time, stripes and peppermint flavor became associated with the modern candy cane. These cookies are a playful evolution: translating the look of a classic confection into a baked treat blends nostalgic candy culture with cookie craft, making them popular at holiday markets and family celebrations across the United States.
Seasonal Adaptations
In winter, keep the peppermint as the key flavor; for spring or Valentine's Day, substitute the peppermint with almond extract and use pink gel coloring for a seasonal twist. For Christmas, consider adding finely chopped dried cranberries to the white dough or dipping half of each cooled cookie in white chocolate for an elegant finish. During summer gatherings, skip peppermint and add lemon zest to the white dough and use bright yellow or coral gel for cheerful stripes.
Meal Prep Tips
For batch baking, make the dough up to 48 hours ahead and keep refrigerated, tightly wrapped. Shape and slice only what you need the day of serving to maintain the freshest edges. If hosting a cookie swap, freeze extra sliced rounds on a sheet and pack them in vacuum bags — they travel without losing their striped appearance. Use shallow, airtight tins with parchment to transport multiple layers safely.
These candy cane cookies are the kind of recipe that rewards small attentions — a brief chill, careful rolling, and a moment to appreciate the peppermint aroma. They invite creativity, travel well, and consistently delight whether shared at a potluck or tucked into a gift box. Make a batch and pass them along; they tend to start conversations as much as they finish plates.
Pro Tips
Use gel food coloring to keep dough consistency firm and achieve vibrant stripes with just a small amount.
Chill shaped ropes for 15–30 minutes to reduce spreading and preserve clear stripes during baking.
Measure flour by spooning into the cup and leveling to avoid dense dough; too much flour results in dry cookies.
If dough becomes sticky while shaping, refrigerate for 10 minutes rather than adding extra flour which can toughen cookies.
This nourishing candy cane cookies recipe is sure to be a staple in your kitchen. Enjoy every moist, high protein slice — it is perfect for breakfast or as a wholesome snack any time.
Tags
Candy Cane Cookies
This Candy Cane Cookies recipe makes perfectly juicy, tender, and flavorful steak every time! Serve with potatoes and a side salad for an unforgettable dinner in under 30 minutes.
Ingredients
Main
Instructions
Preheat and Prep
Preheat oven to 350°F. Line baking sheets with parchment paper and have all ingredients at hand. Allow butter and egg to reach room temperature for even mixing.
Cream Butter and Sugar
Beat softened butter with powdered sugar until pale and fluffy, about 2–3 minutes with a mixer. Scrape sides of the bowl to ensure even texture.
Add Egg and Extracts
Add the egg, vanilla, and peppermint extract and mix until just combined. Avoid overbeating to keep dough tender.
Incorporate Dry Ingredients
Fold in the flour and salt in two additions on low speed until a soft, cohesive dough forms. Do not overmix.
Divide and Color
Divide dough into a larger white portion and a smaller portion for coloring. Knead gel red coloring into the smaller piece until evenly tinted.
Form Striped Ropes
Roll two white ropes and one red rope of equal thickness. Place white, red, white side by side, press lightly, twist once or twice and roll to fuse into a striped rope.
Chill and Slice or Shape
Chill for 15–30 minutes for cleaner slices. For canes, gently bend a rope into a hook shape. For rounds, slice into 1/4–1/2 inch pieces.
Bake and Cool
Bake at 350°F for 9–11 minutes until edges are set. Cool on the sheet for 5 minutes, then transfer to a rack to cool completely.
Last Step: Please leave a rating and comment letting us know how you liked this recipe! This helps our business to thrive and continue providing free, high-quality recipes for you.
Nutrition
Did You Make This?
Leave a comment & rating below or tag
@solushcooks on social media!
Categories:
You might also like...

Spaghetti Squash Mac & Cheese
A lighter take on a classic comfort favorite that swaps pasta for roasted spaghetti squash and keeps all the creamy, cheesy goodness with optional broccoli or chicken for extra heartiness.

Coconut Cream Pie Overnight Oats
A dreamy no-cook breakfast that tastes like coconut cream pie — creamy coconut milk, tangy Greek yogurt, shredded coconut, and optional banana make mornings feel indulgent and effortless.

Roasted Sweet Potato Rounds with Honey & Feta
Crisp-edged sweet potato rounds roasted until tender, finished with salty feta, a drizzle of honey, and fresh parsley—an effortless crowd-pleaser for gatherings or weeknights.
Did You Make This?
Leave a comment & rating below or tag @solushcooks on social media!
Rate This Recipe
Share This Recipe
Enjoyed this recipe? Share it with friends and family, and don't forget to leave a review!
Comments (1)
This recipe looks amazing! Can't wait to try it.
Comments are stored locally in your browser. Server comments are displayed alongside your local comments.

Hi, I'm Lena!
What's Popular

30-Minute Meals!
Join to receive our email series which contains a round-up of some of our quick and easy family favorite recipes.